As an Amazon Associate I earn from qualifying purchases.
Imagine you’re perched on a ridge, the sun setting behind a pine‑filled valley, and you press “record” only to discover the footage is shaky, the angle is wrong, or the mount fell off at the first tumble. For anyone who lives for the blend of camping and adrenaline‑packed outings, the right action camera mounts can be the difference between a memory you’ll relive and a missed opportunity. Let’s rip the glossy marketing pages apart and get straight to the grit: seven brutally honest wins and fails across chest, helmet, and handlebar mounts.
Why Mount Choice Matters for Camping Adventures
Camping isn’t just about setting up a tent; it’s about chasing waterfalls, navigating off‑road trails, and capturing moments that make you feel alive. An action camera that’s securely attached—and positioned for the best view—lets you focus on the experience instead of fiddling with gear. The wrong mount can sap your energy, cause uncomfortable chafing, or, worst of all, snap off and ruin a perfect shot. Below we break down the real‑world performance of each mount type, then hand you a cheat sheet for picking the perfect match for your next trip.
Chest Mounts – The Good, The Bad, and The Ugly
Win #1: Rock‑Solid Stability on Rough Terrain
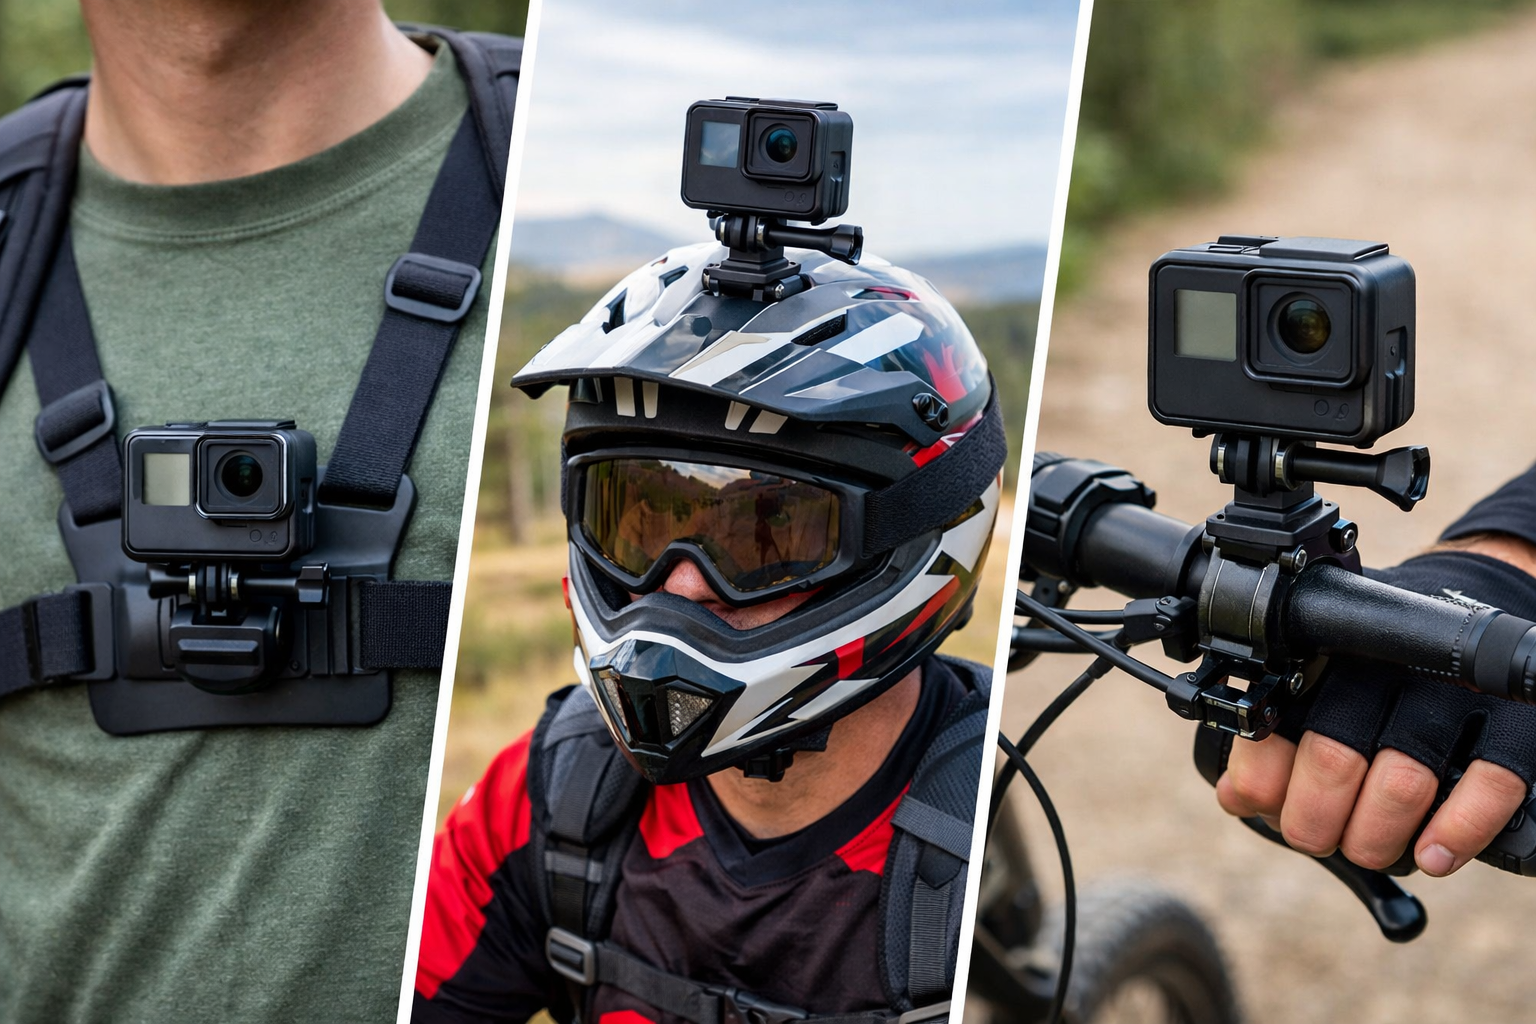
When you’re scrambling over boulders or navigating a muddy creek, a well‑designed chest harness keeps the camera level with your torso, delivering a low‑angle perspective that feels like the viewer is right there with you. The best chest systems spread pressure across the shoulders and chest, reducing wobble even when you’re hopping across uneven ground.
Fail #1: Comfort Issues That Turn Adventure into Agony
Not all chest mounts are created equal. Some cheap versions use a single strap that digs into the sternum after a few minutes. The result? Constant readjustment, sore shoulders, and a nagging distraction that pulls you out of the moment. Look for models with padded, adjustable straps and a breathable back panel to keep sweat from building up.
Win #2: Hands‑Free Shooting for Multi‑Tasking
While you’re setting up camp, cooking over a fire, or climbing a ridge, a chest mount frees your hands. You can still use a trekking pole or a walking stick without compromising the camera’s line of sight. This is especially useful for capturing long‑duration timelapses of sunrise over the campsite.
Fail #2: Limited Field of View for High‑Angle Shots
If you need a bird’s‑eye view of a canyon or want to capture the sky as you look up, the chest position will inevitably cut off the upper portion of the frame. You’ll end up with a lot of ground and very little horizon. Pairing a chest mount with a small, wide‑angle lens can mitigate this, but it’s still a compromise.
Product Recommendation
For campers who prioritize stability and comfort, consider an adjustable chest harness that offers both padded straps and a modular mounting plate.
Helmet Mounts – When to Trust Your Headgear
Win #3: First‑Person Perspective That Feels Immersive
There’s nothing quite like the raw, unfiltered view that a helmet mount provides. Every rock you dodge, every branch you brush against, is captured from the exact line of sight you experience. For high‑speed activities like mountain biking or zip‑lining across a canyon, this perspective makes the viewer feel the adrenaline surge.
Fail #3: Vibration Transfer Can Make Footage Nerve‑Racking
Helmets are built for impact protection, not vibration dampening. When you ride over rough terrain, the shock travels straight to the camera, resulting in jittery footage that can be hard to stabilize in post‑production. Some mounts incorporate rubberized pads, but they rarely eliminate the problem entirely.
Win #4: Quick Release for Safety and Flexibility
Most quality helmet mounts feature a quick‑release lever. If you need to swap the camera, adjust the angle, or remove the mount for a hike without the camera, you can do it in seconds without unscrewing anything. This is a lifesaver when you’re transitioning from biking to a night‑time campfire storytelling session.
Fail #4: Compatibility Headaches With Different Helmet Shapes
Helmet designs vary wildly—from full‑face mountain‑bike helmets to lightweight hiking helmets. A mount that fits snugly on a hard‑shell bike helmet may sit loosely on a soft‑shell trekking helmet, leading to wobble or even a sudden fall. Always verify the mount’s adjustable range before committing.
Product Recommendation
If you need a versatile option for multiple helmet styles, a helmet mount pad with adjustable straps and a rubber base can give you the flexibility you need.
Handlebar Mounts – Capturing the Ride
Win #5: Stable, Forward‑Facing View for Speed Enthusiasts
Handlebar mounts lock the camera to the bike or kayak’s steering column, delivering a smooth, forward‑looking shot that follows your line of travel. When you’re carving down a forest trail, the camera stays level with the ground, making the footage look professional even without a gimbal.
Fail #5: Poor Clamp Design Leads to Slippage
Many entry‑level handlebar clamps rely on a simple screw‑tightening mechanism that can loosen over time, especially when exposed to mud, sand, or rain. A slipping mount will cause the camera to tilt, or in worst cases, tumble off entirely. Look for clamps that use a double‑locking system or a spring‑loaded grip for added security.
Win #6: Easy Angle Adjustment On‑The‑Go
High‑quality handlebar mounts often feature a swivel head, allowing you to tilt the camera up or down without removing the entire unit. This is perfect for switching between a low‑angle trail‑blazing shot and a broader view that captures the surrounding forest.
Fail #6: Interference With Hand Placement
If the clamp sits too close to where you grip the handlebars, it can feel intrusive or even cause you to lose control on technical sections. The best mounts position the camera just ahead of the brake levers or away from the grip zone, but many generic models ignore this ergonomic detail.
Product Recommendation
For a sturdy, adaptable solution, try a universal handlebar clamp that offers a wide diameter range and a quick‑release lever.
How to Pick the Right Mount for Your Next Trip
- Define Your Primary Activity. If you’re mostly hiking and want low‑angle shots, a chest harness is king. For high‑speed biking or zip‑lining, the helmet mount wins.
- Consider Comfort vs. Stability. Chest mounts excel at stability but can be uncomfortable if poorly padded. Helmet mounts give an immersive view but may suffer from vibration.
- Check Compatibility. Measure the diameter of your handlebars, the width of your helmet’s shell, and the circumference of your chest strap area. Choose mounts with adjustable ranges that cover those dimensions.
- Look for Quick‑Release Mechanisms. Whether you’re swapping between a bike ride and a night hike, the ability to detach the camera in seconds saves time and prevents accidental damage.
- Test Vibration Damping. If you’re sensitive to shaky footage, prioritize mounts that include rubberized pads or foam inserts, especially for helmet and handlebar options.
- Weatherproofing Matters. A mount that corrodes quickly in rain or snow will let you down. Opt for stainless steel or anodized aluminum clamps, and consider a waterproof action camera housing if you’ll be near water.
FAQ
Can I use the same mount for both my bike and my kayak?
Many handlebar clamps are designed with a wide diameter range that works on bike handlebars, kayak paddle brackets, and even surfboard rails. Verify the clamp’s maximum size and ensure the mounting surface is flat enough to hold the screw securely.
How do I minimize helmet‑mount vibration without buying a gimbal?
Layer a thin piece of closed‑cell foam between the mount’s base and the helmet shell. This simple addition absorbs a lot of the high‑frequency shock while keeping the camera firmly attached.
Is it safe to wear a chest mount while sleeping in a tent?
Most chest mounts are designed for active movement, not static wear. Sleeping with one strapped on can cause discomfort and may damage the camera if you roll over it. It’s best to detach the camera and store it in a protective case before bedtime.
Final Takeaway
There’s no one‑size‑fits‑all answer when it comes to action camera mounts. The wins and fails we’ve laid out show that each mounting point shines under specific conditions and falters under others. Your best bet is to match the mount to the activity you’ll be doing most, prioritize comfort and stability, and invest in a quick‑release system that lets you adapt on the fly.
Ready to put the theory to the test? Pick one of the recommended product types, attach your camera, and head out to your favorite trail. Capture that first shot, review the footage, and tweak your setup until it feels like an extension of your own body. The wilderness is waiting—make sure your camera is, too.